Below is a video on How to replace an alternator on a H6 Subaru
If you could subscribe or like the video…. thanks. I hope this helped someone out there. If you know someone that it could help just press the share button and share it with them. Be sure to check back soon for do it yourself fixes soon.
Today we will be showing you how to replace an alternator on a Subaru with an H6 3.0L. The first thing we need to do is grab a 10 mm if it’s the stock Subaru terminal this one is an aftermarket one so we will need a 13 mm wrench or socket and ratchet and remove the positive battery cable from the battery. Well tuck it behind the battery or cover the terminal on the battery with a shop rag.
Once we have the positive battery terminal removed we can keep the 10mm out as we need to remove four 10mm bolts that hold the engine cover in place. There are two on each side and two near the top near the throttle body.
Once we have the engine cover removed we can keep the 10mm out as we will need it to remove the inlet for the air box. There are two 10mm bolts in the front. Once we have them both removed we can just lift up and pull towards the drivers side and wiggle it to remove it from where it goes through the fender. We can thread the bolts back in the hole so we don’t lose them or you could use a Magnetic bolt holder.
Next we can take that 10mm and loosen the nut that holds the serpentine belt cover on the drivers side. We just need to loosen the nut. We don’t need to remove it completely. Once we have the 10mm nut loosened we can grab a 12mm socket and loosen and remove the bolt from the other side of the serpentine belt cover. Once we have the bolt removed we can light and flip over the serpentine belt cover over out of the way. Be sure that the cover doesn’t hit or land on the positive side of the battery.
Next we will need a 14mm box wrench hopefully a longer one as we will need to put that on the serpentine belt tensioner and pull it towards the drivers side to create slack in the belt so we can get the belt off. The tensioner is just below the power steering pump and alternator. We’ll take the box end of the wrench and slide it onto the 14mm bolt inside the Tensioner and pull it towards the drivers side. Next we can slide the belt off the alternator pulley or the idler pulley just below the alternator or the a/c compressor and that idler has no grooves.
With the belt off we can undo the two electrical connections off the alternator. One will be a 12mm nut just under the red cover and the other will a plug where we need to squeeze the tab and wiggle it free. Well start with the plug well squeeze the tab and wiggle it free. Once we have the plug removed we can now grab a 12mm socket and ratchet and loosen the nut under the red cover. Once we have the nut removed we can lift and remove the cable off the stud be careful not to lose the lock washer that’s on there. Once we have those two connections removed we can push them out of the way.
Next we can take that 12mm socket and ratchet and loosen the lower 12mm bolt on the lower side of the alternator. We don’t need to remove the bolt all the way as the bracket is grooved and the bolt slides into it unlike the 2.5L where you have to completely remove the bolt.
With the bolt loosened we can grab and pull up and wiggle the alternator towards the passenger side of the car and remove it. You may need to use a screwdriver to help push it out depending on how much corrosion there is. Once we have the old alternator removed we can unpackage the new alternator and get it ready to install.
Next we can take the new alternator and slide the bottom bolt into the lower bracket and wiggle it in to align the top bolt hole with the bracket. With the alternator back in position we can reconnect the two electrical connections. Well push the pull into the hole making sure we hear the tab lock it into place. Next we can reconnect the cable to the stud of the alternator. Well align it on the stud and then place the lock washer on and then the nut. With the lock washer and the nut in position we can take the 12mm socket and ratchet and snug the nut up and cover it with the red cap.
Next we can align the top alternator bolt hole and thread in the 12mm bolt. Well run it down hand tight leaving a ¼” or so gap as the serpentine belt cover needs to go behind it. With that bolt in we are now ready to put the serpentine belt back on. Well grab that 14mm wrench and put it on the serpentine belt tensioner pull it towards the driver’s side and put the belt back onto the a/c compressor pulley and then back onto the alternator pulley and then side it back onto the idler pulley just below the alternator and a/c compressor.
Once you get the belt on you will want to make sure that it is in all the grooves on each pulley, the crank, power steering, alternator, a/c compressor and centered on the two idlers pulleys. You should see a polished edge on the idlers where the belt was riding on them. With the belt on and aligned we can grab a 12mm wrench and tighten the lower alternator bolt.
Next we can swing the serpentine belt cover back into position and behind the 12mm for the top of the alternator. Once we have it in position we can take a 12mm socket and ratchet and snug down the top bolt of the alternator. Once we have that one tight we can switch to a 10mm socket and tighten the other side of the serpentine belt cover by the a/c compressor.
Next we can grab our air inlet duct and slide it back on the part within the fender and align the two bolt holes. Once they are aligned we can reinstall the two 10mm bolts and snug them down with the 10mm socket and ratchet to hold the air inlet duct in place.
Once we have the inlet for the air box in place we can now reinstall the engine cover if your car has it. You will install the four 10mm bolts within the engine cover. One on each side of the cover and two near the throttle body.
Once we have the engine cover reinstalled we can now re-connect the positive terminal to the positive side of the battery. You’ll want to make sure the terminals are clean if there not you can use a battery terminal cleaner to clean them. Well slide the terminal on and tighten it using a 10mm wrench if its a factory terminal for this one well use a 13mm wrench and tighten this one.
If you installed a junkyard, used or even a remanufactured alternator its a good idea to test the output of it to ensure its properly charging the battery. You want to make sure its not under charging or over charging the battery. You can click HERE to watch a video of how to test the output the alternator. If its under or not charging at all you will end up running the car on the battery only and it will go dead and you will be stranded on the side of the road.
So with the alternator properly charging the battery that’s it we have just shown you How to replace an alternator on a H6 Subaru.
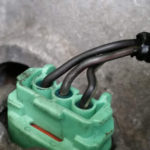
Here is a picture of the wiring on the plug end just in case you break a wire or the plug itself. They have just the plug itself or the plug end with wires. You are able to click the picture to enlarge it.
Very helpful. Get to see and how and what tools you will need before getting started. Thanks will use again
Glad to hear we could help. Thanks for watching and taking the time to leave us a comment. Good luck with the repair.